Skip to content


EMC Isilon AV Scan – Malformed container size

isilon-logo

Code level: Version 7.2.1.1 of OneFS:

We have been using a ICAP server by EMC in order to scan files on the Isilon. Since then, it started detecting numerous threats. So many in fact that it locks up the GUI and the Web interface has to be restarted.   Within this, if there are any special characters within the name of the file type also makes the file get quarantined.  This was due to an issue in the OS that was fixed in a later OneFS release.  After many hours of testing we encountered a similar bug in 7.2.1.3.   We had to upgrade to 7.2.1.4 to finally fix the issue.  *Note that 7.2.1.4 is the last update before version OneFS 8*.  But before fixing the issue, we had to release all of the quarantine so we can move forward. You cannot do this via the GUI due to the massive amount of quarantine and detected threats. Just going to the web page will lock up the Isilon and put you back on the phone. Since I am running this version on multiple Isilon’s, I wanted to know how to always clear the AV before upgrading. Not all remote support checks to make sure that this is empty before upgrading. So I was able to find a handy EMC support article that will save all quarantine items to a file and then purge them.

Full listing of all files in quarantine:

# isi avscan report threat –all | egrep -B2 “Quarantined” | egrep -o “/ifs.*$” | tee -a /ifs/data/Isilon_Support/quarantined_files_$(date ‘+%Y-%m-%d’).txt

This will unquarantine everything and actual potential viruses.   Please make sure you are aware of the risks before running this.

# isi avscan report threat –all | egrep -B2 “Quarantined” | egrep -o “/ifs.*$” | tee -a /ifs/data/Isilon_Support/quarantined_files_$(date ‘+%Y-%m-%d’).txt | while read qFile; do if isi avscan unquarantine “${qFile}”; then echo “$(date ‘+%Y-%m-%dT%H:%M:%S%z’) SUCCESSFUL unquarantine of ${qFile}” | tee -a /ifs/data/Isilon_Support/unquarantined_files_$(date ‘+%Y-%m-%d’).txt; else echo “$(date ‘+%Y-%m-%dT%H:%M:%S%z’) FAILED to unquarantine ${qFile}” | tee -a /ifs/data/Isilon_Support/quarantined_files_$(date ‘+%Y-%m-%d’).txt; fi; done

Posted in Antivirus, CLI, Isilon.


Creating Wireless Bliss with dd-wrt

I have been running alternate firmware on my Linksys routers for years now.   I only buy Linksys routers to the point that I check compatibility before the purchase of  a new one.   I realize you can use a various amount of different routers, I just have had great luck with Linksys.   I have suffered with slow bandwidth around the house to accommodate for all my portable devices that only supports Wireless-G.  Here I will show you that you can make a full scale 300mbps wireless topology while adhering to the legacy devices.

To understand my setup, I will outline what all I have and use it for.

Computer room:

This is where the DSL comes in the house.
Main Router: Linksys E3000 – Firmware dd-wrt e2000-3000-big 192.168.1.1
Computer direct connected running Windows Media server

Living room:

Secondary Router: Linksys E2000 (upgraded from WRT310 for 5Ghz option spectrum) 192.168.1.2
Direct TV HR24 DVR with Whole House DVR
PS3 – DLNA Media Streaming Server
Onkyo TX-NR5007

Bedroom:

Tertiary Router: Linksys E2000 (also upgraded from 310) 192.168.1.2
Direct TV HR24 WHDVR
Samsung Flatscreen with DNLA capable – pretty crappy if I may say so though.

**Also, lets not forget that I use a laptop, iPad and have android phones in the house.   The iPad has Wireless-N, but the phones will utilize the G, so I need something that can be backwards compatible.   Remember, in wireless…If you have something running on a G band, even though it is on an N network this will bring everyone down to G level speeds.   This is where the fun of the Linksys E3000 and it’s dual bands for 2 SSID’s come in. 🙂

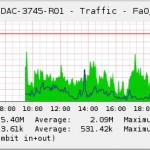
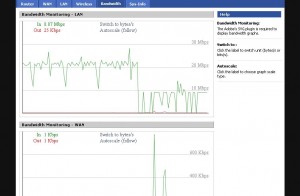
Now here is why I need all the routers.   Most of the items on these lists only use Ethernet.   And I don’t understand why they think you are going to run Ethernet all over your house.   I had no plans in doing that at all.    So to get around all that, I bought three routers and made two of them Client Bridges.    I recommend this plan if you intend to use a 720p to 1080p media stream capabilities.   You can do it with G transmitting at 54 Mbps, but expect choppy and lag when intense explosions render extra bandwidth needs.  This will give the maximum bandwidth to about 30 Mbps when you will require much more for High Def streaming.  For example, here you can see that my limitations have been met while streaming “The Social Network” from my pc to the PS3.   As you can see it works fine because the movie doesn’t really have a lot of action and looks great at 720p.   But lets say you want to get an action movie and it is in 1080p.   There would be no way to watch it at some points.   Fast forwarding and rewinding these types of movies are totally out of the question because of lag.  Also, the PS3 uses a wireless-G card, so we have to take that out of the mix.   To do that we put a Wireless Client Bridge with N-Only capabilities in front of it.  The end result will give you astonishing bandwidth to multiple rooms being able to rewind and fast forward digital movies with ease.   Streaming media players are only getting more popular with the use of Netflix.   However, even though I subscribe to them I wish their quality was better.
 

Off to the installation…

I am not going through the flashing and learning of the interface.   I trust that the people interested will utilize their WIKI’s for each individual supported router.  http://www.dd-wrt.com/site/index.  The site has great information about setup do’s and don’ts.


E3000

Here is my configuration for the Wireless Lan 0 (wl0)
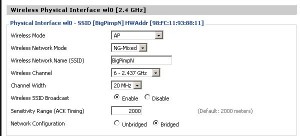
 

We are going to need this for the cell phones, guests or basically anyone who’s device cannot see N routers on a 5GHz spectrum.   There are more devices than you think.   As I sit here typing on my crappy Lenovo laptop that has wireless N, but cannot see 5GHz.  Only 2.4.

Next we will configure the 5GHz only spectrum on the primary router.
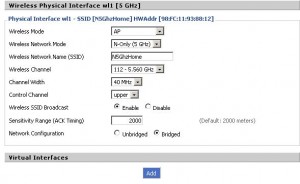
5GHzonly  Here I configured the secondary SSID Access Point for N-only.   I chose a specific channel off of what I read on a forum as a guideline.   I just didn’t want it set to Auto.  Then I changed the Channel Width to 40.


Now we save those changes and setup the Client Bridges.   Assuming you know how to configure your router with IP, PPOE and all the other necessary information for your DSL\Cable.

Client Bridge 1

Now the client bridge needs to be setup.   I recommend you save the setting as you switch pages so you don’t keep having to restart the router.   Also, clicking apply once you set the router to a client bridge seals the deal.   So if there is a mistake, you will have to hard reset the router.   This isn’t uncommon for getting multiple routers hooked up.   I must have had to reset one of the at least 2 times each thinking I was done.  Setting up the client bridge is the easiest part.   Just really 3 steps.
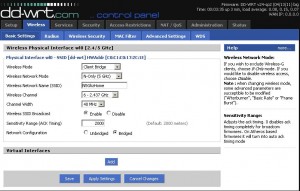
1) Assign it an IP that is in range with your primary router (ie 192.168.1.2)

2) Give the settings i listed in the picture.

3) Assign the same security that you gave the primary router with the 5GHz channel including the same password.


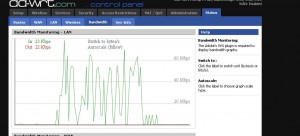
Hit apply and jump on your network and ping the 192.168.1.2 until it responds.   If you don’t receive something within a minute, big chances that a reset of the secondary router is in your future.  Start over and try it again.   Once the routers are communicating you can go into the main router and look at the clients.   From here on out you can add as many wireless client bridges as you would like.  Just give them different names and ip’s.   This turned my Wireless-G PS3 into a 5GHz N only ultra media player.  Ok, I really just wanted to use the word ultra for my home theater setup.   Below is the bandwidth after I added the Wireless-N only 5GHz only prepared at going 300 mpbs.
Enjoy!



Posted in Cisco, Linksys.

Tagged with , , .


Storage vMotion Disks in a Clustered Virtual Environment

I want to go over the gotchas in moving storage around in a MSCS environment in VMware. I came across this one today where I was unable to power on a machine after I storage vMotion over to a new datastore. Now I already knew there was probably going to be an issue because lets just face it, it is a Microsoft cluster. I have never seen the great benefit of having a cluster under a HA and DRS environment in VMware. However, I realize there are some special cases when there has to be an added layer of protection.

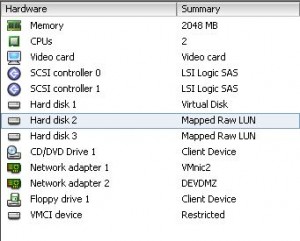
Once the VM disks are built and set as RDM’s,  and the passive node has it’s RDM’s set as stub files in the datastore of the active node; what happens to the disk when you vMotion it?… Well, for whatever reason everything will verify successfully if you have the server shut down to do a cold migration.    However, you will get errors if the VM’s are powered on. In my case I decided to move the active node to another datastore option when it was shut down.  This will let you continue with no problems at all.     But in doing so will take every stub file and create them as VMDK’s. This in turn will totally break the cluster.   From there you will not be able to power back on your cluster note.   Instead you will be greeted but this nasty error: Thin/TBZ disks cannot be opened in multiwriter mode.

Ok, the server is busted.   Panic, delete and start over…No!  It’s is a VM on VMware so you must have done something right.   As long as you haven’t manually deleted the RDM storage yet, this will be a very easily recoverable fix.


Edit the migrated node and *delete* the once stub files that are now VMDK’s

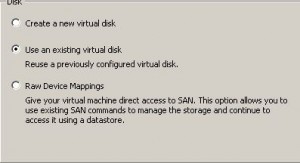
Once they have been deleted, you should just easily re-attach them as RDM’s

Browse back to the original datastore where you stored your local drive of the VM.   Then look for your RDM you should have stored with your virtual machine.  Point the stub file back to the RDM like you created in the beginning.   This should get you back to looking like  it was before the vMotion.

From here you will be able to power on the VM with no problems.   There will be no reason windows will need to re-signature the disk, because it was never powered on.   That would have generated a lot more issues.

Posted in Cluster, Cluster, Datastores, ESX Host, Microsoft, vCenter.

Tagged with , , , .


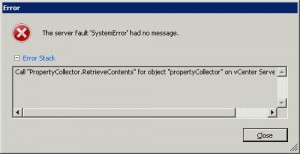
The server fault ‘SystemError’ had no message.

You have to love error messages that you have no idea what it means.  Call “PropertyCollector.RetrieveContents” for object “propertyCollector” on vCenter Server “*” failed.  I got this error message when I tried to clone over a template to a different vCenter farm.   I have seen this issue before at my previous job, but was unable to fix it.   After doing some searching I was able to find find a few things that lead me to believe it happened when we updated vSphere.   I don’t know exactly when, because I have patched VMware multiple times.   This just seem to have an effect on the templates and changing hardware.  This is how I was able to resolve it..  Verify what datastore the server is located on. Remove the server from inventory and then add it back.   It was that simple.   I will assume that an upgrade had messed with the configuration file for the specific VM I was having issues with.   Maybe a connected CD drive that is no longer connected.   However, this is the only work around I found without having to clone the VM.

Posted in Datastores, vCenter.

Tagged with , , .


Extending the C or Boot partition with VMware Servers

I must have extended 30 server C: drives.   To the point where I feel like I am the master.   It is very simple in the virtual world, but always be cautious and make backups.   With that said let me take you through some quick steps.

STEP 1: Make a backup or take a snapshot.

STEP 2: Shut down the VM that you want to extend the C or /boot drive on.

STEP 3: Edit Settings in the VM and click on the hard drive you want to give extra space to.   Then append 10-20 (whatever) Gigs to the drive and then click ok.   You will see vCenter progress back complete with success.  **Note the datastore location of the VMDK**

STEP 4: With the server still shut down, add the server to another existing server.  I like to use a 2008 server since we can extend it through the GUI.  However, I will show both ways with command line as well.

——-2008 – Right click my computer and click manage.   (+) Expand Storage – Then click on Disk Management.   From here you will notice your drive has the free space.   Just right click on the drive and hit Extend.   From here it should be a Next – Next thing.   If it stops you with the next, just adjust the MB down one number and then take it back to make sure you get all MB’s.

——-2003 or CMD – Right click my computer and click manage.    Right click disk manager and rescan the disks.   Once you can see the disk, open up a command prompt.   Type in “diskpart”.   This should start up the diskpart program from within your C:\windows\system32.   If it doesn’t, then you may want to install the admin tools on that machine.   Next you want to type “List vol”.   This will list all the corresponding volumes of HDD on that particular server.   Hopefully, you will see the one with the space you desired.    Beside that volume will be a number.  Then just type “Select Vol (?)”.  Obviously the ? will be the volume number you recently found.  Then just type “extend”.   You should get a successful response if all went well.

Step 5: Remove the HDD from the server you added it to.   Make sure not to click Remove and Delete *duh.   This would be very, very bad.

Step 6: Power on your newly extended VM.

If for some reason you were to get a error message like Windows Boot Failed – 0xc000000e Attach a 2008 server cd and then Boot from it.  Click on Recover.   Open up a command prompt and use the following commands. cd boot bootsect /nt60 c: /force /mbr bootrec /rebuildbcd Answer Yes to the following question to complete the rebuild.   Then just restart the server.

Posted in CLI, Datastores, Tools.

Tagged with , , , .


Server 2008 VM losing Default Gateway

After reinstalling the VMware tools because the mouse pointer was “jumpy”. I rebooted the server and I was unable to ping it anymore. I noticed that the server did not have a gateway anymore after I just put it in. So, I did it again and still could not ping the server. After a few reboots and removing the adapter I realized this was a bigger problem. So I reset the TCP/IP stack by typing netsh int ip reset. Then I just put back in my static ip w/ the gateway.

On a side note, it was great to find out that this was OS related.

Posted in Microsoft.


To Thin Provision? Get it Right the First Time

Let’s face it, space is money and we are always looking for a way to save it.  Thin provising help you do just that if you plan your deployments . Giving a thin provisioned hard drive can expand on demand and consume all data on the datastore if you over allocate the space.  In that event, the datastore can remain full and not allow the running vm’s to write to the datastore causing major issues.   You will have to free up space in order to get the VM’s running again.  Freeing up space can be a task in itself, and this can take some time and when a server is completely down.  I will show you how to setup some alarms to help keep this from happening later.  So I am going to help you show you a few tips that should get you going in the right directions. The below script can give you a birds eye view of what servers would benefit the most from thin provisioning.   First you need to run a powercli script that will give a little more depth on how your environment looks.  I found this great script on virtual insanity’s website.

Copy the contents of this script and put it in a notepad document.  And remember to make the changes in red to your vCenter server.   Place the document under the C:\ so you are able to find the document with ease.

# Set the Filename for the exported data
$Filename = “C:\VMDisks.csv”

Connect-VIServer MYVIServer

$AllVMs = Get-View -ViewType VirtualMachine
$SortedVMs = $AllVMs | Select *, @{N=”NumDisks”;E={@($_.Guest.Disk.Length)}} | Sort NumDisks -Descending

$VMDisks = @()
ForEach ($VM in $SortedVMs){
$Details = New-object PSObject
$Details | Add-Member -Name Name -Value $VM.name -Membertype NoteProperty
$DiskNum = 0
Foreach ($disk in $VM.Guest.Disk){
$Details | Add-Member -Name “Disk$($DiskNum)path” -MemberType NoteProperty -Value $Disk.DiskPath
$Details | Add-Member -Name “Disk$($DiskNum)Capacity(MB)” -MemberType NoteProperty -Value ([math]::Round($disk.Capacity/ 1MB))
$Details | Add-Member -Name “Disk$($DiskNum)FreeSpace(MB)” -MemberType NoteProperty -Value ([math]::Round($disk.FreeSpace / 1MB))
$DiskNum++
}
$VMDisks += $Details
Remove-Variable Details
}
$VMDisks | Export-Csv -NoTypeInformation $Filename

Now use PowerCLI to generate this report and it will stick the output under your C:\.  The excel spreadsheet will list all of your virtual disks on each and every vm that you have in that environment.  Keep in mind that is only the size of the hard drives and not relative to how much free space you have on the datastore.  Obviously you wouldn’t want to use dynamic storage provisioning in every scenario, but I guarantee you will want to utilize it one fashion or another.    From this Excel sheet you should start making notes on what servers could benefit from thin provisioning.   Along with noting servers, make sure you allocate enough space on the datastore for a buffer as well.   I try to make sure I have at least 10% free space in all the VMFS datastores at it’s fullest.  If you leave that buffer, then you will have plenty of room for snapshots for the VM’s.

Next we need to set up some alarms so we can be alerted when we are running out of space.   We can use the walk through that LucD has on his website to generate these scripts.  As you can see from this site, you can set this up with a script or use vCenter to manually create them.  You can set these up to send you an email, or just create warnings in vCenter.  I would create these warnings before I implemented an thin provisioning.

Here are some other great sites to look through when you are doing some research on thin provisioning.

Posted in CLI, Datastores, vCenter.

Tagged with , , , , .


Setup SNMP on vSphere ESX Host without vMA

I have really enjoyed that ESX has made me learn Linux. Having a very Windows background, Linux has always been one of those undiscovered areas I get lost in.

Here I will show you how to setup SNMP from your vCenter server as well as on an ESX host with vSphere.


There are two ways to go about this:

  1. 1) Set this up individually on your ESX servers by opening a SSH window.  You just need putty or an ssh too
  2. 2) Use vMA (vSphere Management Assistant) with instructions to install it located here.

Here we will set them up individually

Warning before we beginIf you haven’t enabled root on your host then this will not be an easy task to get started.  Just note that I will be using “root”.   So you may need to do an “su” before you begin to make yourself a super user.  Also, note that this is way different than old versions of ESX as SNMP is now embedded in the VMware Management Service (Host-Daemon).

I will be utilizing this along with Solarwinds 10.0 Network Performance Monitor which I use. If you have never used it, then you should check it out. There are many great free tools they have for VMware. I assure you, I am not getting paid for saying that. I have also noticed I can manage my EMC Avamar Backup solution using the same tools with SolarWinds. There are many free Linux tools as well as Cacti you can use to get the job done.

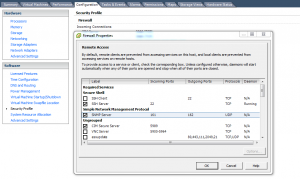
First thing to do is open up the SNMP firewall ports from vCenter to the host you are adding. Check the box and watch the Tasks occur below in vCenter.

Next we move on to one of the ESX hosts.   From here all changes will be made with the “nano” command.   I find it easier to use and navigate around.   Sorry Linux VI fanboys, I am a Windows Macintosh guy.  Open up the tool you use to ssh into the ESX host.   I prefer Bitvise Tunnlier which can be found from my tools page.  Connect to your ESX host and and run the following command: nano /etc/vmware/snmp.xml

Below will be the output of that setting.   Make the appropriate changes to them and hit Ctrl X.    This will allow you to save your modifications.

<config>
<snmpSettings>
<enable>true</enable>
<communities>public</communities>
<targets>server1@162 private</targets>
</snmpSettings>
</config>

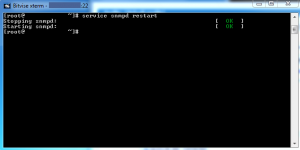
After you have saved the settings, I always run one final command to make sure SNMP is running.   service snmpd restart

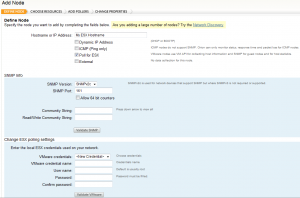
Once you have made sure all the services are running, you then need to go to your monitoring tool.   From here, you can see if the server is responding to SNMP requests.   So, in Orion I go to my Admin page like I am adding a regular server.  Then I tell it my Hostname of the server as well as click the check box for “Poll for ESX”.   Remember to use the FQDN (Fully Qualified Domain Name) of the server or it will time out.   In this version I do not have to add my community name in the middle.   However, I do have to add the ESX credentials located at the bottom.


From here you should be able to successfully add the node to your monitored environment.   There will be no need to add the mib libraries because they have already updated it for vSphere.


Posted in ESX Host, SNMP, Tools, vCenter.

Tagged with , , , , , .


VM’s Produce Long Boot Times after Adding Memory

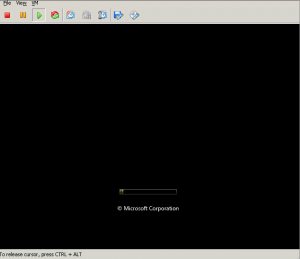
I have seen a few times that a guest VM can get stuck in long boot up periods. This can happen when you deploy a normal server from template, or if you create a new one. What I have noticed is that the problem doesn’t happen until you give the server over 4 gigs of RAM. The server can act normal, but will take unusual long time to restart. The problem happens when it gets to the Windows splash screen, and the bar keeps scrolling. This can literally take over 10 minutes to restart.


I’ve seen this in server 2008 and 2003. It is a pretty common bug that I heard was going to be fixed in vSphere but wasn’t. To resolve this issue I edited the settings of the problem VM and lower the RAM. In my case I moved it back to it’s original size that it had in template. Turn on the guest and make sure it boots correctly this time. If it does, then you are fine to add the memory back to the much larger size without having the same issues. I believe this problem mostly occurs when you adjust the memory and other things right after a deployment.

Posted in Microsoft, vCenter.

Tagged with .


VMware vSphere Health Check Report v5.x Installation and Setup

Here I am going to show you how to install and configure the vSphere HCR v.5 on the Windows platform.  There are a few tools you need before we get started.   Go ahead and download them so you will be ready to implement them when the time is ready.

PowerCLI , Powershell , Report.txtVMware-vSphere-Perl-SDK

vSphere Health Check Report – Please make sure you have the latest copy


*Note* I am going to be installing the version compatible with vSphere and above. If you are currently running ESX(i) 3.5 with update 2 or above, please use VMware Health Check Report v0.9.5

Since vCenter is currently only installable on a Windows platform, this is where I chose to run these scripts from. From here, you can set Task Manager to email you the report on demand. Make sure both Microsoft Powershell (2003 version) and Power CLI on the vCenter server.

If you haven’t done so, go to http://communities.vmware.com/docs/DOC-9842 to download the the latest Health Check script  found right before the comments area.  Next, create a scripts folder under the C: drive to put the file(s) in.

Extract the contents with any compression executable and place the two files in the scripts folder.

There is no need to edit the heathcheck.conf file since the report.ps1 will automate the email process. Take the downloaded file called Report.txt and stick it in the scripts folder.  Rename the the file’s extension to “.ps1”.   This will make it readable by PowerCLI.

When you edit the file it will look like the format below.

$dt = get-date -format yyyyMMdd
C:\scripts\vmwarevSphereHealthCheck.pl –server vCenterServerName –username administrator –password localadminpass –type datacenter –datacenter “DataCenterName” –report C:\scripts\vmware_health_check$dt.html -email yes
$pp = get-process perl
$pp.waitforexit()
$file = “C:\scripts\vmware_health_check$dt.html”
$smtpServer = “YourEmailServerName”
$msg = new-object Net.Mail.MailMessage
$att = new-object Net.Mail.Attachment($file)
$smtp = new-object Net.Mail.SmtpClient($smtpServer)
$msg.From = “vmwarereport@yourcompany.com
$msg.To.Add(“youremailaddresses”)
$msg.Subject = “Today’s VMWare Health Report”
$msg.Body = “Enjoy from myvmland.com!”
$msg.Attachments.Add($att)
$smtp.Send($msg)
$att.Dispose()
Remove-Item C:\scripts\vmware_health_check$dt.html

– Edit the information in BOLD so that it matches your organization. I recommend user a user’s password that does not change. Exit the editor and be sure to save the changes.

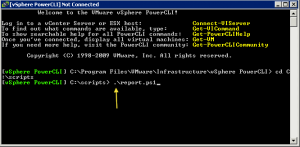
Now, let’s test the script to make sure there are no error. Open up vSphere PowerCLI – Then browse to the scripts directory and execute the script.

If all goes well, you will have a message from the scripts creator (William Lam) telling you to get a cup of coffee/tea and check out his website. This can take a while, as mine took over 5 minutes to finally email me.

The next step is to set windows to auto run the script so you don’t have to manage that.  Anything that helps automate this process so you can just stick to watching your environment.

Open up Scheduled Tasked under the Start Menu and create a new task by clicking “Add Scheduled Task”.   Browse your Applications till you find VMware vSphere Power CLI and click next.  Choose the method of time frame and click next.   From there you need to enter a user name and password that will not be changing.   I would suggest using the local administrator account.   Finish and open up the advanced settings for this task.  Copy and paste the below information

Insert this into the Run: C:\WINDOWS\system32\windowspowershell\v1.0\powershell.exe -PSConsoleFile “C:\Program Files\VMware\Infrastructure\vSphere PowerCLI\vim.psc1″ ” &  “C:\Scripts\report.ps1″

Click the apply and give it a test run.  That should be all the modifications you will need to finish the automation.   Please let me know if this information has been helpful or needs any updates.


If you have any problems running the script then open up PowerCLI from the Start Menu Programs.   Browse to the scripts folder and test to make sure its working with this command:

./ vmwarevSphereHealthCheck.pl –server vCenterServerName –username administrator –password localadminpass –type datacenter –datacenter “DataCenterName” –report C:\scripts\vmware_health_check$dt.html


Please leave some feedback on anything you would like to see or added to this post.

Posted in CLI, Datastores, ESX Host, Tools, vCenter.

Tagged with , , , , , , , , , .